Tech Baat

Welcome to Tech Baat


Visitor No.

Amazing Audible App


Wikipedia

Search results

Search This Blog

Showing posts with label English. Show all posts

Sunday, August 23, 2020

How to Install PYTHON 3.0 | Python Installation in Windows

Hllooooo everyone!! I am back with my new and interesting blog. The title already suggests that today's post is related to one of the most convenient and popular programming languages i.e."PYTHON".Without delay ,let's proceed towards our today's goal.

The tutorial comprises: 

        1. Introduction of Python

        2. Uses of Python

        3. Steps to "Download Python"

        4. Steps to "Install Python"

        5. Verification of the installation .

 Introduction

Python is a high-level 'Object Oriented 'programming language , created by Guido van Rossum in 1991 and further developed by Python Software Foundation. The best part of using Python is that its syntax is much easier as compared to other programming languages and it provides increased productivity.  It supports modules and packages ,thus encourages program modularity and code reuse. It is a open source that means it is free to use even for commercial applications.
     

Uses of Python

Listed below are some of the basic uses of Python-

1. It is often used for creating web-applications and dynamic web content.

2. It is used in development of interactive games.

3. It is used to program desktop applications.

4. It helps in access of database easily.

5. It is also used for  various other applications. For eg :-Robotics, web scraping, scripting, data analysis, audio/video based applications, face detection etc.


Steps to Download Python

1. Go to Google Chrome and type "Download Python" in the search bar.

                                          OR

 Directly download Python by visiting to its official website i.e. "www.Python.org".

2. Click on "Download Python " option at the top.

( NOTE: If you have any specific platform like, Windows, Linux/UNIX, Mac OS etc. then select accordingly from below and then download .)

3. Choose the desired version of Python mentioned below (for eg:- Python 3.8, Python 2.7)by scrolling down and then click on Download icon present in front of each specific version.


   Congrats! Downloading task has been completed .


Steps to Install Python

1. Open the downloaded file (Python) by pressing right click of the mouse.

2. Click on " Run as administrator " option .

3. A pop-up of installation wizard will appear.  Click on "Install Now". Installation will begin.

( Note: Before clicking on"Install Now " , make  sure to check in the box [ ] of "Add Python version no. to the Path " at the bottom otherwise some of the further features won't work. )

After the completion of installation , a page will appear where "online tutorial " and "documentation" will be mentioned. In order to become more familiar with Python,  simply click on the above options. You will get a proper summary based on Python. If you are already aware about Python then simply click on "Close" button at the below.

Congrats! you have crossed your second hurdle that means Python has been intalled .


Verification of Installation of  Python


In order to verify whether installation of Python is successful or not , following two methods are mentioned below :


METHOD 1:

1. Open Python .

2. A terminal window (as shown below) will be appeared.


METHOD 2:

1. Open the command prompt and type "Python" .

2. Press "Enter" key.

3. A pop-up window will appear in which its version number and certain other information will be mentioned.

        Congrats! Verification has been completed.


This is the green signal for the successful installation of Python. Now without any further hurdles / obstacles you can start your interaction with this dynamic interpreted language(Python).For any query regarding this tutorial contact via mentioning your doubts in comment section.Don't forget to answer ,Was this tutorial useful?

That's all for this post. For further interesting technical blogs , Stay connected with your channel "Tech Baat " and give your love and support to this channel as well.

                                Thank You :-) 

Saturday, July 4, 2020

How to create bootable or Live Kali | Linux | Ubuntu | Tech Baat


Today we are going to talk about live Kali Linux/Ubuntu. How it is helpful. And to create it.
1. Overview
What can we do With a boo-table Kali/Ubuntu USB Drive/Stick,
you can See below :
  • Install or upgrade Kali/Ubuntu
  • Test out the Kali/Ubuntu desktop experience without touching your PC configuration
  • Boot into Kali/Ubuntu on a borrowed machine or from an internet cafe
  • Use tools installed by default on the USB Drive/stick to repair or fix a broken
    configuration
Creating a boo-table Kali/Ubuntu USB stick from Microsoft Windows is very simple and we're going to cover the process in the next few steps.
Alternatively, we also have tutorials to help you create a bootable USB Drive/stick from both Ubuntu and Apple macOS.


2Requirements

You will need:
·         A 4GB or larger USB stick/flash drive
·         Microsoft Windows XP or later
·         Rufus, a free and open source USB stick writing tool
·         An Ubuntu ISO file. See Get Ubuntu for download links

Take note of where your browser saves downloads: this is normally a directory called ‘Downloads' on your Windows PC. Don't download the ISO image directly to the USB stick! If using Windows XP or Vista, download version 2.18 of Rufus.

3USB selection

Perform the following to configure your USB device in Rufus:


1.    Launch Rufus

2.    Insert your USB stick
3.    Rufus will update to set the device within the Device field
4.    If the Device selected is incorrect (perhaps you have multiple USB storage devices), select the correct one from the device field's drop-down menu


You can avoid the hassle of selecting from a list of USB devices by ensuring no other devices are connected.


4Boot selection and Partition scheme

Now choose the Boot selection. Choices will be Non bootable and FreeDOS. Since you are creating a bootable Ubuntu device select FreeDOS.
The default selections for Partition scheme (MBR) and Target system (BIOS (or UEFI-CSM)) are appropriate (and are the only options available).


5Select the Ubuntu ISO file

To select the Ubuntu ISO file you downloaded previously, click the SELECT to the right of "Boot selection". If this is the only ISO file present in the Downloads folder you will only see one file listed.
Select the appropriate ISO file and click on Open.


6Write the ISO


The Volume label will be updated to reflect the ISO selected.
Leave all other parameters with their default values and click START to initiate the write process.


7Additional downloads

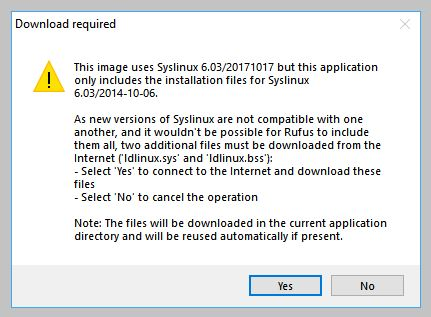
You may be alerted that Rufus requires additional files to complete writing the ISO. If this dialog box appears, select Yes to continue.


8Write warnings

You will then be alerted that Rufus has detected that the Ubuntu ISO is an ISOHybrid image. This means the same image file can be used as the source for both a DVD and a USB stick without requiring conversion.
Keep Write in ISO Image mode selected and click on OK to continue.


Rufus will also warn you that all data on your selected USB device is about to be destroyed. This is a good moment to double check you've selected the correct device before clicking OK when you're confident you have.


If your USB stick contains multiple partitions Rufus will warn you in a separate pane that these will also be destroyed.

9Writing the ISO


The ISO will now be written to your USB stick, and the progress bar in Rufus will give you some indication of where you are in the process. With a reasonably modern machine, this should take around 10 minutes. Total elapsed time is shown in the lower right corner of the Rufus window.


10Installation complete

When Rufus has finished writing the USB device, the Status bar will be green filled and the word READY will appear in the center. Select CLOSE to complete the write process.
Congratulations! You now have Ubuntu on a USB stick, bootable and ready to go.
If you want to install Ubuntu, take a look at our install Ubuntu desktop tutorial.


Finding help
If you get stuck, help is always at hand:

Was this tutorial useful? 


Sunday, September 22, 2019

Latest Trick to Remove Shortcut Virus from your Pen drive | Computer Storage | Memory Card in 30 Sec or Less

Welcome to TECH BAAT

As you know Computer Virus infection is only removed through antivirus programs, but today we are going to talk about Shortcut Virus which is a new modern virus which comes automatically in your Computer/USB/SD/PEN-DRIVE card and convert your Content & DATA into a shortcut.

Some time this virus also invisible your all contents. The first thing which is really not good that the Shortcut virus problem is not removable by anti‐virus programs. When you Scan the infected storage with antivirus program they give “No threat detected” while Shortcut virus is present there.
Which was really confusing and those people who didn’t know how to remove this virus, they just do the format to Infected storage Devices,


Read Also : How to download Latest Windows 10 ISO - Windows 1809 , Windows 1903 | Top Tricks


So if you’re helplessness and going to format your storage device then please don’t do this again, because it is not a solution but if your storage not contain anything important then you should go for format to your Storage device not computer storage, because formatting is not a right solution. Also there another method to flush out shortcut virus.

Yes We can remove shortcut virus from Pen drive / Memory Card.

The source of this virus is internet, third party software, USB storage devices and more other sources also. Sometime you connect your pen drive to your friend’s computer for exchanging data and you didn’t know that your friend’s computer is already infected by shortcut virus, Now Your Pen-Drive  has been infected to virus also. So when you connect your that storage device or Pen-drive to your computer it automatically infect your computer also.

Watch Also :  क्या आपके पीएफ का पैसा जमा हो रहा है ? How to know your employer is paying your PF or Not?

Remove Shortcut Virus From Pen Drive & SD Card with the help of CMD


Yes, you can use command prompt to remove this virus:
Before beginning I highly recommend you to First Scan storage with your antivirus and then go for below method.

Step 1-  Connect Your USB storage (Pendrive/SD card) to your Computer. Scan your storage with your antivirus program (Not compulsory but its effective) . If your antivirus found
virus then delete it.

Step 2- Open Command prompt as Administrator
            (in Windows 7 or earlier ⇛ Windows key + R  then Type CMD & ENTER, )
            ( in Windows 8 or Later : Search for “CMD”  then Right click to CMD and Select “Run as Administrator” )
or
            Right click over Start button and select "command prompt (Admin)"

Read Also : Control Your Laptop or Desktop at one click , Enable GOD Mode in Computer Or Boss Mode

Step 3- Type below Command in CMD prompt :
attrib ‐h ‐r ‐s /s /d <Your USB drive letter>:\*.*
<Your USB drive letter> here type your USB drive Letter. To check your USB drive letter go in My Computer or This PC and check. For ex, if your drive letter is “E” then the command is like:
attrib ‐h ‐r ‐s /s /d E:\*.*

To know more about this command Type  " attrib /? " In CMD.

Now your Shortcut files again convert into normal files. After successfully processing the command process and removing shortcut virus. I highly recommend you to copy your
USB data to your computer  and Then Format your USB storage.
Then copy your Data in USB from you Computer.

Watch AlsoHow To Stop windows Update in Windows 10 | Disable Windows Update | windows 10 Tips

Tips For USB to avoid infection of Shortcut Virus

➤ Don’t open any USB Storage before scanning
➤ Don’t connect your storage to those computers who don’t have Antivirus Program
➤ Don't connect your USB to unknown Computer like cyber cafe etc
➤ Avoid third party software’s
➤ Keep Up to date your Windows
➤ Keep up to date your antivirus program
➤ Run boot time scans twice a week
➤ Don’t open harmed websites
➤ Don't open Spam Mails


Thursday, August 8, 2019

How to find Windows Activation Key & How to Activate windows 8.1/10

Hey Guys!

Today we'll going to talk about the Windows Activation & Windows Key for windows 8.1 and windows 10 .
This is happening multiple times we got that in our systems some error like

" You windows License will expire soon "

You get answer for below questions

how to activate windows 10 for permanently
how to remove kms activation from windows 10
how to activate windows 8.1 using cmd permanently
How to find windows key via cmd
What is the command for Windows activation?


Mostly people are facing below issues :
Your Windows license will expire soon but windows are Activated  –  This is the most common problem and many users are facing and they are reported that this message appears even if Windows is already activated.

Error of Your Windows license will expire soon in your system ASUS, HP,  Dell & Lenovo -
This error message are appearing on almost many PCs  ASUS, HP, Dell & Lenovo owners reported this problem on their devices.


Your Windows license will expire soon keeps popping up – 
This message can be rather annoying because it appears frequently. Its really irritating and people are not able to work properly.

Watch Now : How to Downlod Driving Licence Aadhar ? What is DigiLocker create Account on Digilocker in hindi ?

Root Cause why these error are coming ? 

You may see this error because the Windows  product key you entered isn’t valid. Product keys are unique—assigned to a specific user to install on a single device. If a key was used (or attempted to be used) on multiple devices, it’s marked as not valid. To activate Windows, you’ll need to provide a different Windows key unique to your device.

Some times systems are not able to communicate with windows KMS server.
KMS activations are valid for 180 days, a period known as the activation validity interval. KMS clients must renew their activation by connecting to the KMS host at least once every 180 days to stay activated. By default, KMS client computers attempt to renew their activation every seven days. After a client’s activation is renewed, the activation validity interval begins again.

For more info on error code  : Visit on Microsoft Support

Solutions :

In the past, a new Windows PC would display its product key on a sticker,Thats why its a difficult task to manage and carry it. Due to on paper and one time activation there is a lot of possibility for Windows Licensed Piracy.

But with Windows 8, Microsoft has switched gears and now  the laptops/branded PCs sold after 2010-11 started without having the Windows product key sticker.

This is because while manufacturing companies started injected the product key into the BIOS itself, so that people would not lose it and while installing the OS it would detect it automatically from BIOS and not ask the user.

Read Also :How To Check Whether Your Employer is Paying your PF or Not


How To get windows key via cmd


Now we are coming are on the solution for above mentioned all problems:

Open command prompt :
  • Type CMD in Serch box and hit the enter

Type Below command :

wmic path SoftwareLicensingService get OA3xOriginalProductKey

After entering this cmd you will get a product key.
Then copy it.

Again Open changepk.exe 


After opening there is a pop-up screen will display to enter that product-key which you have copied from cmd. 

After entering product key, your windows will Activate permanently.


How to check windows activation Status 


Open command prompt
type slmgr /xpr


I hope this information will help you , if you face any issue kindly let us,
You can contact us on our official pages YouTube Facebook Instagram Twitter

Don't forget to share with friends & family.  
Keep Smiling 😊


Thursday, July 11, 2019

How To Check Whether Your Employer is Paying your PF or Not

The biggest problem of today is that despite making everything online to make transparency in this online world, there are millions of people who do not know anything about their rights. And the other people who take advantage of are very knowledgeable.


So today we will talk about one of these online things. Today we will talk about PF Contribution. As we have seen, many times it happens that our Employer deducted some amount from our salaries on the name of PF but does not deposit it.
And when we ask, we are told that your money has been deposited.
Now the question is how will we know ?

 We have two ways to find out this.

Watch Now : How to Downlod Driving Licence Aadhar ? What is DigiLocker create Account on Digilocker in hindi ?


Watch Also : Super Tricks Whatsapp | Delete message from your friends mobile l Latest what's app trick

 The first PF passbook that everyone knows. But sometimes the passbook is not updated. Or do not see the amount deposited in it, then how do we know if our PF got accumulated or not?

So the other way that someone probably would not know or very few people would know.
So let's see how to check if your employer deposited your money in your pf account .


So we have to open official website

Read Also : How To Control Your Laptop or Desktop On one click , How to enable GOD Mode in Computer Or Boss Mode

Click on EPFO Corner and go on Dashboards


Now open Dashboards and click on MIS

Watch Also : Super Tricks Whatsapp | Delete message from your friends mobile l Latest what's app trick


Click on Office Tab and go on Establishment Search 

Watch Now : How to Downlod Driving Licence Aadhar ? What is DigiLocker create Account on Digilocker in hindi ?


Now from here you can search your company by Name or by Establishment ID
Establishment ID is mentioned on your PF Passbook.
(Starting 7 digit of your PF Number is your Company's Establishment Number)

Watch Now : How to Downlod Driving Licence Aadhar ? What is DigiLocker create Account on Digilocker in hindi ?

You have to fill any one column and then enter the Captcha and click on search.

After that you will find your Company Name as shown in Picture then click on View Details


Watch Now : How to Downlod Driving Licence Aadhar ? What is DigiLocker create Account on Digilocker in hindi ?

After Clicking on View details you will find Whole Details of your company.
As shown in below picture click on View Payment Details .


And you will get all payment details which is done via your company for your PF.


I hope this information will help you , if you face any issue kindly let us,
You can contact us on our official pages YouTube Facebook Instagram Twitter

Don't forget to share with friends & family.  
Keep Smiling 😊


Just For You

Popular Posts

Best For you